Blackjack basic strategy chart: every hand, every upcard, one page.
Three grids — hard totals, soft totals and pairs — with the solved play in all 340 cells, for the rules you set. Read it, print it, save it, or learn it from the eighteen lines underneath that between them cover the whole thing.

The chart, for your table.
Rules 6 decks · dealer stands on soft 17 · double on any two · double after split · no surrender
Blackjack basic strategy chart — 6 decks, dealer stands on soft 17, double on any two cards, double after split, no surrender.
Your hand down the side · the dealer’s card across the top
Hard totals
| You have | 2 | 3 | 4 | 5 | 6 | 7 | 8 | 9 | 10 | A |
|---|---|---|---|---|---|---|---|---|---|---|
| 5 | H | H | H | H | H | H | H | H | H | H |
| 6 | H | H | H | H | H | H | H | H | H | H |
| 7 | H | H | H | H | H | H | H | H | H | H |
| 8 | H | H | H | H | H | H | H | H | H | H |
| 9 | H | D | D | D | D | H | H | H | H | H |
| 10 | D | D | D | D | D | D | D | D | H | H |
| 11 | D | D | D | D | D | D | D | D | D | H |
| 12 | H | H | S | S | S | H | H | H | H | H |
| 13 | S | S | S | S | S | H | H | H | H | H |
| 14 | S | S | S | S | S | H | H | H | H | H |
| 15 | S | S | S | S | S | H | H | H | H | H |
| 16 | S | S | S | S | S | H | H | H | H | H |
| 17 | S | S | S | S | S | S | S | S | S | S |
| 18 | S | S | S | S | S | S | S | S | S | S |
| 19 | S | S | S | S | S | S | S | S | S | S |
| 20 | S | S | S | S | S | S | S | S | S | S |
Soft totals
| You have | 2 | 3 | 4 | 5 | 6 | 7 | 8 | 9 | 10 | A |
|---|---|---|---|---|---|---|---|---|---|---|
| A,2 | H | H | H | D | D | H | H | H | H | H |
| A,3 | H | H | H | D | D | H | H | H | H | H |
| A,4 | H | H | D | D | D | H | H | H | H | H |
| A,5 | H | H | D | D | D | H | H | H | H | H |
| A,6 | H | D | D | D | D | H | H | H | H | H |
| A,7 | S | Ds | Ds | Ds | Ds | S | S | H | H | H |
| A,8 | S | S | S | S | S | S | S | S | S | S |
| A,9 | S | S | S | S | S | S | S | S | S | S |
Pairs
| Pair | 2 | 3 | 4 | 5 | 6 | 7 | 8 | 9 | 10 | A |
|---|---|---|---|---|---|---|---|---|---|---|
| A,A | P | P | P | P | P | P | P | P | P | P |
| 2,2 | P | P | P | P | P | P | H | H | H | H |
| 3,3 | P | P | P | P | P | P | H | H | H | H |
| 4,4 | H | H | H | P | P | H | H | H | H | H |
| 5,5 | D | D | D | D | D | D | D | D | H | H |
| 6,6 | P | P | P | P | P | H | H | H | H | H |
| 7,7 | P | P | P | P | P | P | H | H | H | H |
| 8,8 | P | P | P | P | P | P | P | P | P | P |
| 9,9 | P | P | P | P | P | S | P | P | S | S |
| 10,10 | S | S | S | S | S | S | S | S | S | S |
How to read the chart
- A pair? Pairs grid first. P means split and play each new hand from the top; any other letter means play the pair as its total.
- An ace counting as eleven? Soft grid. Hit it and it may turn hard — then you are back on the hard grid.
- Anything else? Add the cards and find the row on the hard grid. Two cards or five, the row is the total.
Ds is double if the table allows it and stand if it does not — which is also the play once you have already taken a card. Rh is surrender where it is offered and hit where it is not. If soft and hard totals are new, soft vs hard hands is the guide before this one.
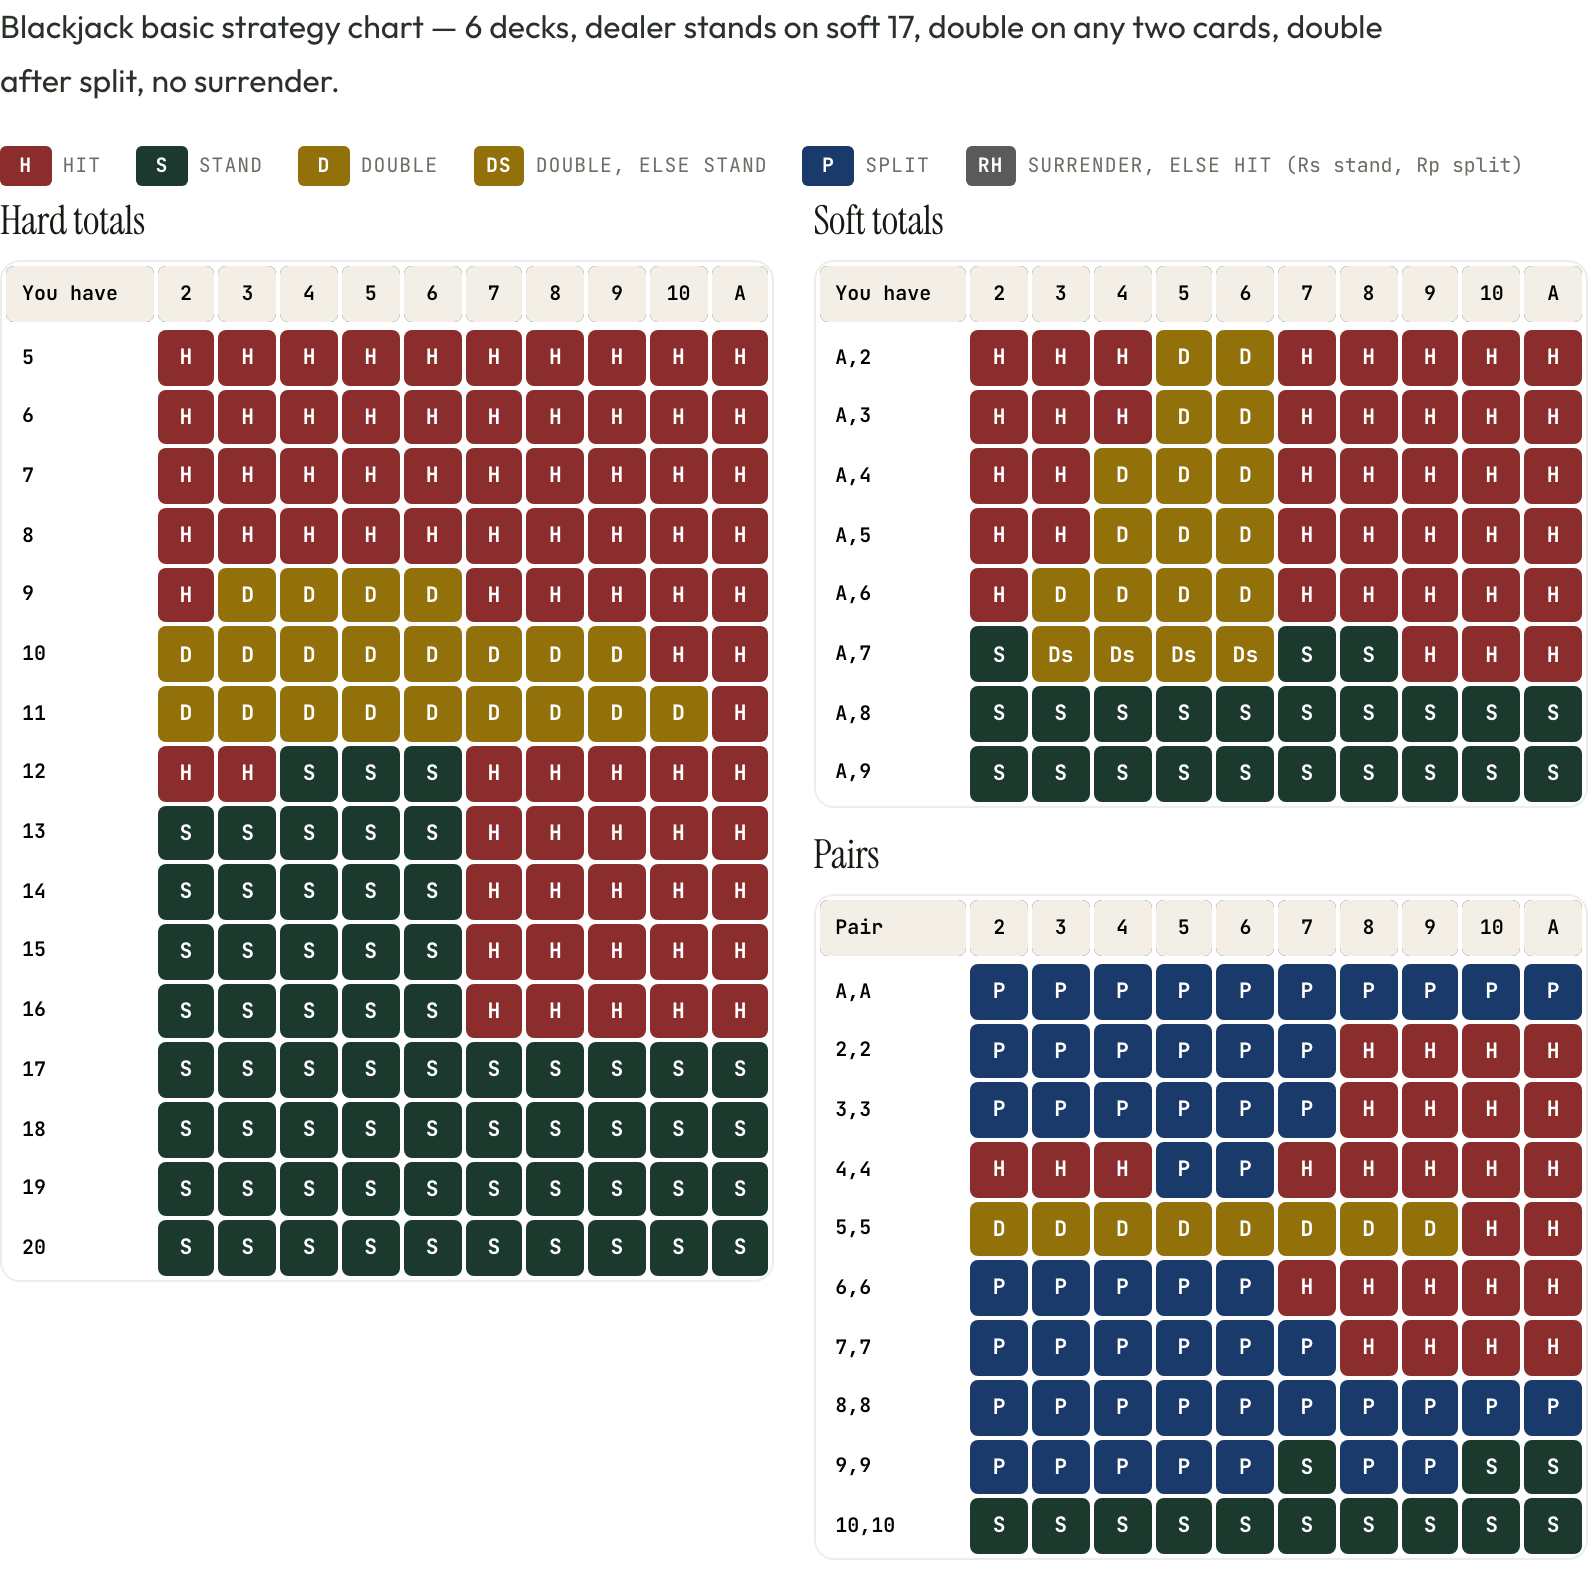
The chart for the standard game as a picture for your phone or a sheet for your pocket. Playing different rules? Set them above and print that instead.
Every cell is solved in your browser by the engine behind the strategy calculator. The six-deck grid matches the published chart cell for cell; at one or two decks a few borderline cells can differ from a printed card, which averages over more hand compositions than a total-dependent grid does.
The whole chart in eighteen lines.
Nobody memorises 340 cells. You memorise these — the hard lines one sitting, the soft lines the next, the pairs the third. All 18 hold in every cell of the standard chart; pick one to light up the cells it covers, and change the rules above to see whether it still holds.
- 1 Hard 8 or less: hit.
- 2 Hard 9: double against 3 to 6, otherwise hit.
- 3 Hard 10: double against 2 to 9, otherwise hit.
- 4 Hard 11: double against 2 to 10; hit against an ace.
- 5 Hard 12: stand against 4, 5 and 6, otherwise hit.
- 6 Hard 13 to 16: stand against 2 to 6, hit against 7 to ace.
- 7 Hard 17 or more: stand.
- 8 Soft 13 and 14: double against 5 and 6, otherwise hit.
- 9 Soft 15 and 16: double against 4 to 6, otherwise hit.
- 10 Soft 17: double against 3 to 6, otherwise hit.
- 11 Soft 18: double against 3 to 6, stand against 2, 7 and 8, hit against 9, 10 and ace.
- 12 Soft 19 and 20: stand.
- 13 Aces and eights: always split.
- 14 Tens: never split. Fives: never split — play them as a hard 10.
- 15 Nines: split, except stand against 7, 10 and ace.
- 16 Twos, threes and sevens: split against 2 to 7, otherwise hit.
- 17 Sixes: split against 2 to 6, otherwise hit.
- 18 Fours: split against 5 and 6 only, otherwise hit.
The order matters. About seven hands in ten arrive as a hard total, one in seven as a pair and one in ten as a soft hand, so the seven hard lines are the ones you will lean on most. The soft lines are where people go wrong, because the same total is not the same hand. The pair lines are the shortest and the most expensive to get wrong — aces and eights above all.
What the rules move.
Every printed chart is right for one game. These are the cells that change when a rule changes, each found by solving the whole chart again with that one rule flipped. The shape never changes; a few cells do.
Dealer hits soft 17
3 cellsThree cells become doubles: hard 11 against an ace, soft 18 against a 2, soft 19 against a 6.
No double after split
7 cellsSeven small-pair splits go back to hits: twos and threes against a 2 or 3, fours against a 5 or 6, sixes against a 2.
Late surrender offered
4 cellsFour hands surrender instead of hitting: hard 16 against a 9, 10 or ace, and hard 15 against a 10.
Double on 9 to 11 only
18 cellsEvery soft double disappears: fourteen cells fall back to hit and the four Ds cells on the soft 18 row fall back to stand.
Two decks
3 cellsHard 9 against a 2 becomes a double, and two soft cells (A,3 against a 4 and A,6 against a 2) tip over by a few hundredths of a percent.
Single deck
10 cellsTen cells: hard 9 against a 2 doubles, hard 12 against a 3 stands, four soft hands gain a double, and threes, fours, sixes and sevens each gain a split against one more card.
Eight decks
1 cellOne marginal soft double goes: A,2 against a 5 becomes a hit.
Moving a cell and costing you money are different things
The rule that moves the most cells is not the one that costs the most. Blackjack paying 6 to 5 instead of 3 to 2 moves nothing at all — every cell is the same — and costs more than every other rule on the board put together.
The dealer hitting soft 17 moves three cells and costs about a fifth of a percent. Late surrender moves four and gives back a little under a tenth. The house edge calculator prices each rule for the table in front of you; this page only says what to do differently once you are sitting at it.
Using it at the table.
The chart is allowed. What it is not is fast.
A printed card is permitted at almost every blackjack table — the casino sells them in the gift shop, because a player who follows one still loses half a percent. Paper or laminate only, never a phone, and at table pace: consult it on every hand and the pit will ask you to put it away. Some rooms let you hold it but not lay it on the felt. Online, nobody is watching.
The reason to learn it anyway is that a play you have to look up is a play you will sometimes skip looking up.
The basic strategy trainer deals you hands, grades each play against the solved answer for your rules, and keeps the ones you got wrong so you can drill just those. Ten minutes a day for a week and the chart is yours.
The strategy calculator is this chart one cell at a time: pick the dealer’s card and your two, and it shows the play and what every other option would have returned. Faster than reading a grid when you have the hand in front of you.
The house edge calculator says what the rules you set above are costing you. The chart tells you how to play a bad game well; it cannot tell you to leave it, which is sometimes the right play.
Where this goes next
This page is the chart; the basic strategy guide is the reasoning behind it. The three decisions it spends most of its cells on each get a guide of their own: doubling down, pair splitting and surrender.
Print it. Learn the lines. Then stop needing it.
The grids are the reference; the eighteen lines are what you take to the table.
Three grids, one order
Pairs first, then soft totals, then everything else. The small letter is the fallback: Ds stands when you cannot double, Rh hits when you cannot surrender.
Eighteen lines cover all 340 cells
Seven for hard totals, five for soft hands, six for pairs, every one checked against the solved grid. Change the rules and the page says which still hold.
The rules move cells, not the shape
A dealer hitting soft 17 moves three cells, no double after split seven, late surrender four. Set your table’s rules at the top and print that chart, not a generic one.